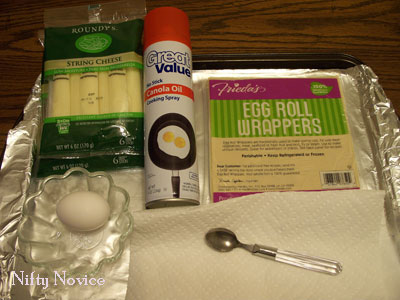
Saturday, October 22, 2011

Mozzarella Sticks (9-17-11)

While on Pinterest.com, I found a great picture of mozzarella sticks. Someone had written underneath about baking them instead of frying them. So, I followed the original link to here to get the initial set of ingredients.  Then, I did various browsing online to find out how to bake similar items.  Since it was a lot of browsing and random clicking, I don't have the original link, so bear with me.  Although - to be honest, the fried sticks tasted better.  Just sayin'!

Ingredients:
~ 12 pieces string cheese
~ 12 egg roll wrappers (OK. Side note here... I spent FOR-EV-ER (in my world. To most people, this would be more like 2-3 weeks) trying to find these in the freezer section like all the stupid websites said it would be in... No.  They were by the tofu in the produce section.)
~ Cooking spray
~ Egg for sealing the egg roll wrappers (although water works just as good.  Save the egg for a cake! LOL  I read that the egg would be better at sealing the egg roll wrapper... Let's see how well that works!)


First, prep the items... Line the cookie tray with foil and spray with cooking spray.  If necessary, unwrap the string cheese.  Mix up the egg.


Next, roll up your cheese sticks.  I had them on a piece of wax paper.  Be sure to moisten some paper towels to lay over the open egg roll wrapper package. (Side note: To preserve the egg roll wrappers if you do not use all of them, wrap them in a moist paper towel to keep them from drying out and put them in a Ziplock bag.  They will stay good for about 2 weeks.)  Don't forget to tuck in the sides!!  And at the end, use your egg wash or water along the tip before pressing it against the stick. It will (in theory) help it stay closed.


Spray the top of the sticks quick with your cooking spray and put in the oven at 400 for 15 min... Or not...

I ended up pulling mine out after about 10 minutes I believe.  This is why:


Yes.  The cheese erupted.  Which is why I questioned the "sealing power" of the egg wash.  But, alas, it did not stop me from eating it with some yummy pizza sauce (OK... I know it's usually marinara sauce, but the pizza sauce in the squeezy bottle is just so much fun!!).


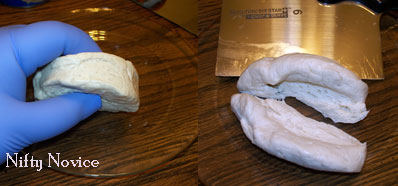
Update: On 10-9, I tried the frying idea...  I wrapped the cheese sticks up the same as before, using water to seal.  Then I put it in a pan of hot oil (I'm very proud of myself - this was only the second time I've done something like that!  And this time, I didn't try to throw the food in from like a foot away!).  Roll them around every few seconds so that they are equally browned, and then pull them out (after probably 60 seconds total) and put them on some paper towels to help absorb the oil.  The cheese tried sneaking out of a few of them, but I grabbed them out in time.  My hubby was very impressed by the frying skills!!  I may try that again some time!!  They tasted super yummy!!  It's amazing what happens when the cheese stays in the wrapper!  :-)


Skip the baking. Go for the frying!!  MMMMMMMMMMMMMMMM!!!

Thursday, October 20, 2011

Pizza Muffins (9-17-11)

Oh yes! You read that right! PIZZA MUFFINS!!!  As I've mentioned before, I've become quite addicted to a site called Pinterest.com.  It can be very inspirational, and I decided that I was going to stop browsing and put a few things into action!!  These are really easy to make and can easily be done with children!!  The original post can be found here.

First, get the ingredients together...
~ Cooking spray
~ 1 Tube of refrigerator biscuits (like the original poster, I used Reduced Fat Grands. You won't want to use a "Flaky Layer" type biscuit)
~ Pizza Sauce (I used a squeeze bottle...less waste and easy to manipulate)
~ Mozzarella cheese (I used sliced)
~ Pepperoni slices (or whatever you want for a topping, but keep in mind that you don't have a ton of room!)


Preheat the oven to 375 and coat the muffin tray with your spray.


Undo the biscuits (be careful... I don't care if they fixed it so it doesn't pop on it's own... When I poked it open and it popped, it still startled me! LOL).  Cut each biscuit in half (suggestion - go the long ways - from side to side...not from top to bottom.  Then, it is already in a round shape...or...at least... it should be. May help to not use a chopping knife for it as well. That tends to eliminate the round shape. *cough* Oops! LOL).


Now, pull the biscuit half into a large circle.  I found it to be easiest to turn it on the side so I could pull straight down.  Work with gravity.  It will save on the frustration.


Now, you are going to start making the biscuits.
1 - Line the muffin cup with your pulled dough circle.  It is best if you have enough that it can drape over the edge/onto the top of the tray... Otherwise, you are fighting gravity again if you don't work fast enough... the dough will slide right down!
2 - Pour a little bit of sauce in.  Just enough to fill the bottom about 1/4-1/2 inch.
3 - Sprinkle in some cheese!!
4 - Put your topping in.
5 - Sprinkle just a bit more cheese for good measure.
6 - You'll have a beautiful tray of pizza muffins!  Note that there are only 8 biscuits in a tube.  So for some, instead of having biscuit halves to waste, I just put an entire biscuit in the muffin cup.  Makes it a bit more cramped, but still do-able.


Bake for 15 minutes until golden brown.  You'll want to let them cool a bit (I can't be held responsible for others burning their mouths... I don't even like taking responsibility when I do it to myself! LOL), but this definitely isn't a "freeze-until-later" type of meal.

1 - Done in the pan!
2 - They pop right out!!
3 - BEA-U-TI-FUL bottom!!!  Nothing burned!  SCORE!!!!
4 - Yummy inside!!  (But be careful... The sauce at the bottom tends to like to spurt out at you. Not that my hubby and I would know! *cough* LOL)


Update: On 10/9, I used a large muffin tin (like this one: Baker's Secret Basics Nonstick 6-Cup Texas Muffin Pan) and put an entire biscuit in each cup.  I think I'll do it this way in the future.  It made it seem a bit less "bite-size" and more of a nice snack.

1 - Nice in the pan!
2 - Still turned out fantastic on the crust! YAY!
3 - And still super yummy on the inside!!


I definitely will not be losing this recipe!!! HIGHLY recommend for a movie day!!

Raisin Snickerdoodles (9-17-11)

This is an alternative to the previous Snickerdoodle Cookie post.  After I made the Raisin Chocolate Chip Cookies, my hubby asked if I could make Raisin Snickerdoodles... So... here are the short notes for them!

Have your 16.5 oz roll of refrigerator sugar cookie dough sliced up.  I also had about 1 cup of raisins and the 1/3 cup sugar (Splenda in our case), 2 teaspoon ground cinnamon, and 1 teaspoon nutmeg blend (i.e. "Snickerdoodle Spices").


To blend the raisins into the cookie dough, I just grabbed a bunch and smooshed it into the dough (yes - "smooshed"... We get real technical here at Nifty Novice! LOL).


Roll each one up into a ball, roll it into the "Snickerdoodle Spices" and place on your sprayed pan about 2 inches apart.  You'll notice 2 cookies on the far left side of the picture... My hubby asked me to put some coconut flakes on there, hoping the toasted coconut would taste real good...


Baked at 350 for 10-13 min until golden brown... Although... I couldn't really tell about the edges of the cookies... Since it turned into one huge cookie!


It did, however, split up easy enough to go on the cooling rack.


The toasted coconut didn't turn out quite as he had hoped.  There was a bit of a toasted coconut taste to it, but not quite enough.  Maybe next time, I'll give him a bit more coconut. ;-)

The cookies actually tasted pretty good.  I just wish there was a way to get them to hold their shape like the Raisin Chocolate Chip Cookies did... I'll have to figure out what the deal is with that.  And, while the "Snickerdoodle Spices" tasted ok, I think we'll skip them next time and just have raisin cookies.  (But, check out the bottom of that cookie!!  PERFECTION AGAIN!!!)


We're getting a bit more creative... Definitely getting interesting!  LOL

Raisin Chocolate Chip Cookies (9-10-11)

Here is another recipe from the wonderful book: The Ultimate Shortcut Cookie Book - Raisin Chocolate Chip Cookies.

Ingredients:
1 16.5oz Roll of Refrigerated Chocolate Chip Cookie Dough
1/2 teaspoon Gound Cinnamon
1 Cup Raisins


Preheat your oven to 350 degrees. Spray the pan with non-stick cooking spray.

Break up your cookie dough into little pieces in a bowl and let it sit out for 10-15 minutes to soften.  Although, I'm not sure it really needs that much time... You're going to be working the dough, so use your best judgement...and listen to your tummy... Your tummy will tell you when it's time to move on! ;-)


Stir in the cinnamon and raisins!  And if a few extra raisins pop in, hey... I won't tell a soul!  ;-)


OK.  Now you can either mix it with a mixer (paddle attachment!), wooden spoon, or the Nifty Novice way - gloved hands!!  Get in there!!  FEEL THE DOUGH!!!!!  Connect with your inner child!!  You know you wanna!!


When it's all mixed, you should have a nice, moist hunk of dough.


Take a spoon and spoon out your cookie servings.


Roll that teaspoon amount of dough into a ball (or, in my case, an oval-shaped hunk of dough)!!!


Put them on the sprayed pan 2 inches apart.  (Ignore the previous burnt cookie stains that show up so stinkin' well in this picture.  I'm a little bitter from that excursion of my hubby's... He's still not allowed to touch the tray! LOL)


Bake for 10-13 minutes or until just set and golden at edges.  However, apparently, my view of "golden at edges" is a bit off...


I was happy they didn't expand as much as the refrigerated sugar cookie dough... I wouldn't say it was incredibly tasty... It lasted a few days here...and that's a long time for us!  Oh... and... ummmmm... raisins and chocolate...not a real swell idea to overindulge on both at the same time.  Just trust me.

As you can see though, the instructions are SO incredibly easy!!  And I was so happy that it didn't involve crazy ingredients!!  I may actually try it again, but maybe leave it in the oven a little bit less...

Sorry!!

Hi, everyone!

I just wanted to post a quick apology for my absence. I had gotten very into Pinterest.com (many of my upcoming ideas are from there!), and then started doing mystery shopping... So unfortunately, while I was taking pictures and doing some activities for the blog, I just wasn't finding the time to post... BUT, over the next few days, stay posted!!  I have SIX - yes - SIX blogs that I need to write up and post here for you!  I hope you enjoy!!  We've had some success, some failure... But I guess that is all the name of the game when it comes to becoming an expert, right?

Love you all!