Saturday, August 27, 2011

Easy Snickerdoodle Cookies (8-27-11)

Hi everyone!!!

Feels like it has been forever since I've posted - even though it has just been a few days! Hope everyone's having a great day!!

Let's give you the background here... I had a quota to meet on one of those book-buying sites (kind of like the "book version" of Columbia House), so I bought a bunch of baking/cake books. One of which is called The Ultimate Shortcut Cookie Book. This book has 745 recipes that start with refrigerated cookie dough, cake or brownie mix, or ready-to-eat cereal.  It has so many great ideas in there!  I have a feeling that this book and I will become very fast friends!!

One of my favorite cookies is the snickerdoodle.  I don't know why, and it's only been over the past few years that it has entered the sacred category of "Favorite Cookies," but I find them MMM-MMM GOOD!  As a side note, please do not mistake this being a snickerdoodle with what my mom calls her snickerdoodles which are Snickers baked into a cookie dough (I may feature that as a future blog as well).  This is for actual snickerdoodles.

So... HERE GOES!!  Easy Snickerdoodle Cookies!!

Ingredients:
1/3 cup sugar (I used Splenda which can be used in place of it at a 1:1 ratio)
2 teaspoons ground cinnamon
1 teaspoon ground nutmeg
1 16.5oz roll of refrigerated sugar cookie dough, well chilled


I actually didn't even use the silver spoon or the butter knife.

First, mix in the sugar/Splenda, cinnamon, and nutmeg.  I used the teaspoon measuring spoon and just mixed it all up together using that.


(It would have been nicer if the nutmeg was a bit more "ground"... O:-) )

Next, I sliced up the cookie dough.  The recipe said to do it into 22 slices.  Seriously?  That would be like a MINI-bite cookie.  I have a big mouth.  I don't do mini cookies.  So, I did 12 slices.


(Ignore the fact that you can only see the end of the tube on one side.  The other side stayed in the wrapper when I cut it and...ummm... I had to...ummmm... taste-test it!  YUP!  It was still good! O:-) )

Next, take each slice and roll it into a ball.  I thought it would be a bit firmer, but it was super easy to squeeze it and roll it into a ball!


Now, take each ball and roll it into your sugar mixture.


Be sure the baking sheet is either non-stick or you spray it with a non-stick spray (or use some sort of other liner). Here's what the finished pre-cooked balls looked like:


Now, put them in the oven at 350 for 10-13 minutes (until edges are golden and centers are just set - per the book.  I don't really know what "just set" means though...).

Next, I did what probably few people do.  I realized I have never (that I can remember) really watched a cookie bake.  Watch it go from the ball shape into the flatter cookie shape.  So, I pulled the chair out, turned on the oven light, and watched.  Please excuse the drips down the glass.  I hadn't thought about doing this until I put the cookies in, so I could clean the outside, but not the inside.


Let the cookies cool in the pan for 2 minutes and then put them out on the cooling rack...


(The brown on the top of the cookies isn't burnt cookie.  It's extra cinnamon/nutmeg.)

Here is the top and bottom of the cookie.  LOOK, MOM!!  I DIDN'T BURN THE BOTTOM!!!  Check out that perfect brown on the bottom!!


And since I am one of the most impatient people EV-ER, I had a cookie after only about 2 minutes on the cooling rack.  In case you are wondering, 2 minutes does not result in a cookie being "completely cooled."  This results in the cookie curving a bit in the first pic! O:-)  I probably should have left the cookies in a bit longer.  The insides weren't completely cooked thru.  It wasn't like it was raw, just "soft."  I'm sure now that it has had some time to cool, it is finished all the way.


Update: After cooling for almost 2 hours, it was the same amount of "softness" in the middle. Again, not horrible, but I probably could have left it in the oven for another minute or two.

Definitely happy I made these... Now, have to get to flipping thru that wonderful book for an idea to use with the refrigerated chocolate chip cookie dough I bought!!

Friday, August 19, 2011

Brownie Balls! (8-13-11)

OK... Everyone who loves chocolate, raise your hand!!!!  This blog is for all of you!!  The only way I can describe the end result is: It's a piece of chocolatey heaven!

We make a lot of brownies here at the Nifty Novice home.  My hubby loves brownies, and I tend to make pretty good ones, so I make them for him.  He has made, I think, one good batch in all of the times that he's tried (which, to be honest, isn't that much because I can't bear to see something go wrong with an entire box of brownies).  He came home from work on Wednesday and said that they were having a luncheon at work and he wanted to bring brownies.  I told him I would make them on Thursday before going to my best friend's house.

I did not take pictures of this process as it is a regular for us.  However, I DID do something different this time... To ease the removal of the brownies from the pan, I lined the pan (actually, there were two pans... I made two boxes of mix) with aluminum foil.  I had read that a lot of people do that and it sounded perfect to remove it AND it saved the pan!  DOUBLE WIN!  The problem is that I had never done that before... So while I sprayed the bottom of the pan with oil spray, I thought the foil would stick on the side, so I sprayed the sides as well.  This is a baking no-no - as I was told by my baking idol, Jaime.  If you spray on the sides of the pan, the mix doesn't rise because it's sliding back down the surface (when I make a cake, I spray the entire pan, but then I put a dusting of flour over all of it.  That helps keep it stick-free but still allow it to rise).  Sure enough, BOTH pans came out with the brownies not even an inch high (oh - and I had followed the directions to add an extra egg for "cake-ier brownies"...Cake-ier my foot! LOL).  My hubby was kind enough to not tease me about them, but they also didn't get taken into his work the next day.  So now, I had two 9x13 pans with 1/2-inch brownies.  And this is where my journey begins...

I'm sure you've heard of cake balls or cake pops.  It's "all the rage" and definitely something I will be doing and blogging about more in the future...  I believed I saw a few mentions somewhere about making brownie balls or brownie pops.  Since I wasn't confident enough in what I was doing to make the pops (and didn't want to waste the pop sticks - not that I could find where I had them either but that's not the point!), I decided to make brownie balls.


Yup... That's how thick the brownies were. That may have also aided in the SUPER chocolatey taste - since they were so condensed...

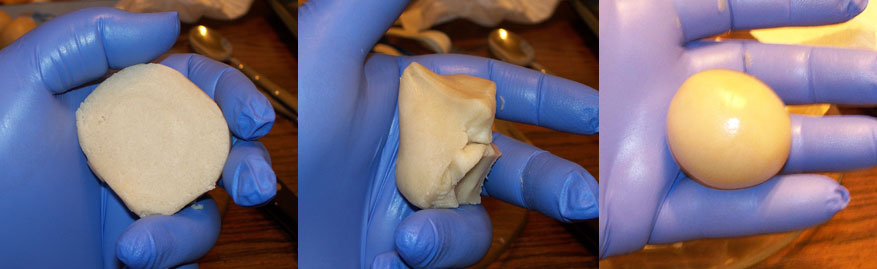
First, take the brownies and cut off the edges since they tend to be harder.  Great to eat straight, but not as easy to work with to make the balls.  Then, I divided out the rest of the brownies into quarters.  I read in a book that it is how I am supposed to do it to help break them up (take the quarters, rub them against each other and it will create the crumbs).  However, I think because the brownies aren't real "airy," that didn't work.  Oh well... made it look like I knew what I was doing!  LOL


When you crumble, you don't want any chunks.  Try to get them as crumbly as possible.  I think that, again, this would be easier with something not as dense and moist as brownies - I had some chunks and whenever I moved the pile of crumbs around to keep smooshing, the crumbs would mash together and become a clump.  And no - I did not suddenly join The Blue Man Group!  I wear gloves.  :-)  This process is probably easiest to just dive right in there with your hands verses trying to do any tools.


Next, add store bought frosting (BTW - I would probably say it is perfectly acceptable, even from the anti-box-mix crowd, to use box mixes for the cake/brownie balls/pops, as well as store bought frosting... Just makes the process a lot easier).  The tubs come in like 16-ounces.  What I was reading was to use about 12 ounces for one cake.  I figured that since I had two batches of brownies, but combined, they would equal the size of one cake, that I would just use the entire 16-ounces and call it good.  Honestly, it worked pretty good...  I would probably have liked another scoop or two of frosting, but I could still work with what I had.  I used fudge frosting (to go with the fudge brownies!).


Just start mashing it into the brownies with the front and back of your spoon.  It can be a bit tough, but eventually, you'll see it all come together.  You want it to not be TOO frosting-like, but have enough frosting to be able to squish it together and have it keep its shape.


Next, I used the cookie scooper my mom got me for Christmas.  It was its maiden voyage!  Scoop, roll to make into a smooth ball, place on wax paper on cookie sheet.


They look so neat and organized!  LOL  You may be able to see a few that aren't completely smooth all over.  I believe this is a result of the lack of frosting.  But it didn't affect anything in the long run (that I noticed at least!).  Put the pan in the FRIDGE to firm up.  Don't do the freezer.  I guess a lot of books say to use the freezer, but then all of the blogs and people making them say to use the fridge.  It does just as good of a job and you won't have the condensation issue that you would as they defrost.  And the condensation is a BIG issue when dealing with the Candy Melts that we use to coat.  Any moisture and the candy melts will seize up and be good for nothing.  I prefer the bags of the candy melts because they are 14 ounces... For this batch, I used an entire bag as well as about 1/4 of a bag that I had sitting around from a while back.


This is my setup.  I had a second cookie tray set up to put the dipped balls on.  Then, the space they created off of tray #1 would give me space on that tray to put more (since I knew I wouldn't be able to place them as close together as I did with just the plain balls).  The black cup contains Heath - Bits O Brickle Toffee Bits (just the toffee bits - not the ones with the chocolate bits as well). You can top it with anything you want - or nothing at all!  (But it gave me an excuse to buy one of my FAVORITE baking treats - EVER!  LOVE LOVE LOVE!!!  And I just saw that SKOR bits exist too!!  MUST get my hands on those!!)  I had a toothpick to help when I put the covered ball down, run the toothpick along the bottom of the ball so when the candy melts harden, you can take the ball off the sheet and it won't have a big "skirt" around it.  However, I used two spoons and were able to manipulate them to get as much of the excess candy melt coating off so that there were no real skirts created...

To cover the balls, drop the ball into the coating and then use the spoon to spoon coating over the balls.


I scooped the ball up with one spoon, scraped excess coating off with the other spoon, then rolled the ball over to spoon #2 and used spoon #1 to scrape.  Honestly, I probably should have added some shortening to the candy melts.  It would make them a bit runnier and then the coating, I believe, would be smoother.


Put the finished ball on the wax paper.  If you want to put a topping on it, you would do it now while the coating is still wet to hold onto the topping.  You can probably dip like two or three before it is too late to put topping on, but I would just do it right after each one to be on the safe side.  Maybe have someone (kid?) help you with this part!  The pops would be better for the topping because you wouldn't waste as much - you'd just dip the pop into the topping and call it good.  However with the balls, you need to sprinkle the topping, so you have a bit more mess.

I did about 1/2 to 2/3 of them with Heath bar topping.  I left a few plain (hubby said he liked them even just plain!), and did the rest with just the plain coating - no topping.


I put them in the fridge to harden up a bit more and here's the end result....


It's definitely sweet and VERY chocolatey.  But so yummy!!  And definitely a two-biter.  I have a big mouth and I have the need to bite half of it, admire the middle, and then pop the rest in!  LOL

I do have a lesson learned from this.  It's taken until this morning for me to figure out the problem.  After I put them in the fridge to firm up at the end (with the coating on them), I noticed that for some of them, if brownie was exposed (this was especially a problem on the bottom since the chocolate kind of goes out and leaves brownie there), it was "weeping".  It didn't even seem like enough to say that it was "sweating"... just some moisture seeping out.  Didn't change the flavor at all.  I have done some searching and it appears that after the initial balls have firmed up, before coating them, bring the balls back to room temperature.  They may have been too cold and while the condition would have been worse if they were frozen, it was just like condensation.  For us, I just put a layer of paper towel down and put the balls on top of that.  Works perfectly and no one is the wiser (except for now that I have exposed the secret! LOL).  I have a feeling this may not be as much of a problem with the pops because you can more thoroughly coat them and not leave any space for cake/brownie to be exposed.

This is definitely something I will be making more of in the future.  Everyone has really loved them!  While, considering wait times, it can take a while to finish them, its really not all that labor-intensive!

Update from 10-26-11: When making the candy melts, I read about adding vegetable shortening (i.e. "Crisco") to the melts. It will help thin out the coating so that it won't be so "heavy" in contrast to the brownie, as well as spread out the use of the melts.  I waited until the candy melts were about 75% melted and then added a tablespoon or two to the mix (about 1/2 of a bag of melts) and stirred it up...  I kept heating and stirring until the shortening melted, but if you get impatient, you can scoop out the unmelting shortening and toss it.  Make sure you keep stirring during use though...

Monday, August 15, 2011

Pineapple Upsidedown Cake (8-6-11)

My hubby loves pineapple upsidedown cakes.  I had bought one with everything in the box, but hadn't taken pics of it.  However, he liked it so much, he asked me to make another one.  The issue that we ran into was that the box mix that was on sale, wasn't the one with everything included.  It was just the pineapple cake - and at that, it was about twice as much mix as the first one...  So, come with me as I make this mix into a pineapple upsidedown cake - Nifty Novice Style!!

First, I assembled all of the ingredients and tools based on what the box needed, as well as what I needed for the top of the cake (THANKFULLY, I had done the other one first...so I knew there was a topping that went down before the pineapple, so I could do some quick research online to find out what that would be - it's brown sugar.)  Also, you may notice that I used crushed pineapple instead of the standard pineapple rings and cherries... A few reasons for that.  #1, the first box used crushed pineapple so it was what I was used to and #2, it's easier to disguise when you've sneaked some of the pineapple (and cherries if I had them there!) if it's crushed.  Ummmm...er...ahhhhhhhh... NOT that I would know.  Really!  You don't believe me?  Yeah.  I wouldn't either.  LOL  O:-)  (I HAD to taste-test the pineapple to make sure it wouldn't poison anyone... It passed the test! LOL)


Next, I took some butter and dotted it on the pans.  Because this had more mix than the other brand of mix I had used in the past, I ended up making TWO round cakes.


I put it in the oven to melt a bit.  I ended up putting it in too long (darn that taste-testing!  Takes so much time! LOL) that the butter ended up caramelizing a bit... I know butter shouldn't caramelize, but it wasn't really burnt, but definitely not straight up like it should have been.  I drained out the burnt parts and put 2 more dots of butter in and put those in for just a few minutes - keeping a better eye on things!

As that was going, I started making the cake mix.  I tend to prefer to put eggs into a smaller dish first and then put them in the bigger dish... Something about shells constantly breaking off and having to fish them out...  VERY annoying.  Again, not like I would know myself! LOL


I took the pineapple and drained it a bit into my measuring cup to use in place of some of the water.  I couldn't really get a good strain on it, but I got about 1/3 of the water requirement out of pineapple juice.  I guess that is a downfall in using the crushed pineapple.  It's a bit harder to get the juice out - at least with our can opener which opens the top of the can from the outside (so it doesn't fall into the can).


I mixed everything up.  Yes.  I'm using the wisk for a handheld mixer.  Yes.  I am not using said handheld mixer.  I love using wisks.  I feel it helps really mix stuff up and gets out the clumps.


Next came putting the brown sugar in the pan on top of the butter.  OK.  DON'T LAUGH.  I had to pretty much chisel the brown sugar apart.  My mom has gotten me those darn bear things that you put in the brown sugar that keeps it from clumping like two or three times.  I can never find them.  Goodness forbid, I put them right into the container.  I may just have to buy new brown sugar.  Anyways, I thought that the sifter would help to break it apart and make sure there weren't any clumps anywhere.  Ehhhhh - Not so much.  Actually, the chunks were pretty easy to break apart with my fingers once I realized I was getting no where with the sifter.


Next, add the pineapple... Get a decent layer going and you can go to the edge if you want.


Add the batter...


The juice you see around the sides?  From the pineapple that I didn't fully strain.  I wasn't feeling very optimistic about these cakes.  And I didn't want to spread the cake mix out too much because I was afraid it was "picking up" the pineapple and wouldn't work right... so I left it like this.

I cooked it for the time it said on the box, and as soon as I brought it out of the oven, I flipped the pan over onto a glass dish, leaving the pan over it for a couple of minutes.  Then, it should lift right up and you have your cake.


Finished cake.  Not as great to look at as the ones with the slices, but at least I knew I'd have pineapple in every bite - and that was far more important to us!  :-)

I asked my hubby to pass me the cake so I could take the picture.  I have such a goofball for a hubby!!  :-D  At least I know he was excited for the cake!


And, a shot of the inside of the cake...


So... There ya go!  It really wasn't too bad!!  I really did actually shock myself with this one that it turned out so well!  And it was great using the crushed pineapple to have a taste of pineapple in every bite.

Sunday, August 14, 2011

Strawberry Cake (7-17-11)

Sorry for the slight delay! Hope everyone has had a good couple of days!  Just cleared out the camera, so I have two posts to make - and a third one when I finish up the project!

So I was dying to make a cake after a very long dry spell (like 3 month-long!).  So for my hubby & I, I made a two-layer strawberry cake.  He suggested that, rather than putting vanilla pudding in the middle like I tend to do, I should put canned strawberry pie filling in the middle...

First, I made two beautiful (if I must say so myself!) strawberry cakes... one box of batter into two 9-inch pans.


LOOK AT THEM!!!  Don't they look freaking BEAUTIFUL!?!  The white stuff on the side is flour.  I spray the pan with cooking spray, use a paper towel to help spread it around and make sure I get in ALL the crevices and up the sides.  Then, I put flour on the bottom and sides.  The flour on the sides help the cakes to rise...otherwise, if I just had the spray on there, they would "slide" back down.

Next, I made the buttercream frosting.  I don't have any "action-shots," but here's a pic of all the ingredients...


I use Wilton's standard buttercream frosting.  I get compliments all the time.  I think people like the frosting more than the cake!!  But they say how it's sweet, but not TOO sweet.  You can find the recipe here: Wilton Buttercream Icing ... Or, just do this (Electronic mixer would be best, but I used a handheld - not as good...hoping to get a KitchenAid before the end of the year) : Cream 1/2-cup vegetable shortening and 1/2-cup softened butter (one stick). Add 1 teaspoon CLEAR vanilla extract.  Add 4-cups (apx 1-pound) of sifted powdered sugar - one cup at a time - beating on medium speed.  Once the icing appears to be well-mixed but dry, add 2-tablespoons of milk and beat at medium speed until light and fluffy.

I sliced the tops off of the cake to make it a smooth surface.  This was wrong point #2 (the first one was the not-so-perfect icing since I couldn't get it super fluffy because of using the hand mixer).  I didn't cut it straight. I tried to eyeball it.  NOT the right thing to do.  I have a cake leveler, but it was a cheap one and I don't like it because it was "tearing" cakes up... So I have my eyes on another one... Wilton Large Folding Cake Leveler  It looks like it has the serrated-edges and seems pretty nifty!  So of course, a nifty novice needs something nifty!  LOL

I put the first cake down on the cake pan, put a "dam" around the outter edge of the middle and put the pie filling in.  This was wrong point #3.  I did the wrong tip on the cake decorating bag.  I forgot until it was too late, that I don't normally put a tip on... I just leave the coupler on and use that to make the dam.  So.... the dam was too small to help protect the deep strawberry pieces from falling out of the cake.

Then, I put the frosting on.  However I really wasn't "in sync" with it, so it really wasn't a good frosting job...and then with the seeping strawberry gel, it just got worse.  When I was done, to just "finish" the cake, I put some of the remaining strawberries and gel that I DIDN'T cram into the cake, on top.


See?  It's not smooth.  You can see the cake crumbs.  It's really not good.  And this is the GOOD side!!!

Here's what it looks like in the inside...


So yeah... That is my strawberry cake.  We'll see how long it takes before I can let go of the imperfections I see and make another cake like this.

I am learning though that boxed cake mix IS super moist - but it's not always the best for the cakes I make... I'll have to figure something out... make some sort of cake mix myself and then use a simple syrup.  I heard that should help with the moisture issue.

Help Needed: Lentils

OK... quick question here and slightly off topic...  I know it's been a few days, and I have a few posts that I just need to type up and I'll get on here...  But I need insight/help here.

As I mentioned, I am trying to lose weight.  I've been tracking numerous nutrients and noticed I tend to be below my recommended amount for fiber.  So, my wonderful hubby bought lentils.

I had them for the first time today.  Maybe it was because I had the texture envisioned as being like peas.  But they were NOT smooshy like peas.  And he even said he cooked them longer than he should have...  They were, perhaps, one of the most disgusting foods I've ever eaten.

Anyone out there know any good ways to get lentils in food without having to really taste them?  (BTW - I'm really not a huge veggie person...)  I would really appreciate it.  I know these can be healthy, but unless they taste better, I am NOT eating them again... LOL

Monday, August 8, 2011

What Sets This Blog Apart?

Some have wondered what sets this particular blog apart from others.  Why make another craft/food blog?  There are so many out there...

Here's what I've noticed with the ones that are out there that I have seen...

They all show you the perfect result.  They don't necessarily show you the mistakes that got to that perfect result.

While I AM a perfectionist and it's a bit difficult on me to show mistakes, I want everyone to learn with me.  I want to not only become an expert in these categories... I want you to too!!  Seeing everyone's perfect results every time can be disappointing if you can't get that same result.  At least - that's how it is for me... I have to assume that I'm not alone!!

Learn with me! And if you have any tips that will help (like I said - I tend to do things the hard way), I'd love to hear them! Share your expertise and we can share it with others!!

"Making mistakes simply means you are learning faster." ~Weston H. Agor

Saturday, August 6, 2011

Pie-In-A-Jar

I have a friend on Facebook that I've known since I believe 3rd grade. Her name is Jaime. I think it's safe to say that she's my "Baking Idol". She bakes all the time and everything always sounds so wonderful and looks so great. One time, she posted a link to Our Best Bites which is a blog similar to this one - only bigger (currently! Maybe one day, I'll pass them! LOL)...they have crafting and baking ideas on there. I found and fell in love with: Pies in a Jar...

So here's the quick scoop on how to make these:

Get wide-mouth mason jars. (Here's a link to some on Amazon, but more and more grocery and big-box-type stores are carrying them now... Ball Regular Mason Canning Jar 1/2 Pt., Case of 12 It's very important to get the WIDE-MOUTH jar...

Next, make the pie crust. You can use a store-bought crust, but I think you lose some of the level of creativity available when you do that. LOL Our Best Bites had a recipe for a Galette. It's a panless pastry. But the crust is all I'm interested in... 2 cup flour, 11 Tablespoons real butter (no exceptions!), 1/4 teaspoon of salt, and 4-5 Tablespoons of ice water. Put the flour and salt in a bowl. Cut COLD butter from the fridge into smaller chunks and put them on top of the flour mixture. Cut the butter into the flour until the butter is in crumbly pieces. Add ice water a tablespoon at a time while stirring the mixture with a fork. It'll be able to form up into a ball.

You do NOT need to spray the jars or put anything in them to make the sides and bottom greasy. You have butter in the yummy crust that will help with that! Take pieces of your crust and line the jars on the bottom and sides with the crust. You should go to the top of the jar - or darn close to it!

For the filling, you CAN use a canned fruit, but if you have the time and patience (or a great hubby like I had for the first round of this), I'd go for fresh fruit. In this case, I made an apple pie filling with chopped apples. We had a lot of apples, so while the recipe just calls for 3 Tablespoons of flour, I mixed in a bit more flour with the apples. Then, add sugar to taste - up to 1/2 of a cup. I believe for these, I used very little sugar. Since I was using apples, I also mixed in a bit of cinnamon (nothing measured... just mixed til I had a pretty color) and some lemon juice to save the integrity of the apples (at least - I believe that's why! LOL). Mix all of that up with your fruit.

Divide your filling out amongst your jars. I had enough that I could do all 12 jars. (If you're going to go overboard, do it right! LOL). I filled the apple pies a bit too much and there ended up being some overflowage after baking. I would stop with like a half of an inch to go at least. Then, dot some butter on top of the fruit. (Finally, I have some pics from this point forward!)


Next, decide how you want to top your pie. Remember to leave some sort of opening for steam to escape while you are baking. Since I made an apple pie, a lattice top just made sense! I laid a snake of dough on top of the lattice to make it look a little more eye-pleasing, brushed some melted butter on top, and sprinkled it with Splenda (since we didn't have sugar - Splenda is a great fill-in!).


At this point, I STRONGLY suggest putting the mason jar top on and putting them in the freezer. We had some right away and compared to the ones we had after they were in the freezer for a while, they weren't as good. The freezer helps build up the moisture and created sort of a "sauce" in the pie. Was definitely worth it to freeze it.

When you are ready to make them, remove the lids and put the jars on a cookie sheet (always be prepared in case of overflowage!). It's ok to put the jars right in the oven rather than defrosting them... If you are real concerned (like we were), just put the jars and sheet into the oven before preheating and then they will warm up with the oven. Put them in the oven at 375-degrees for 50-60 minutes (baking them fresh, only leave them in for about 45 min). The top should be a nice golden brown.


O. M. G. Isn't that the most yummy-looking pie ever?!?! To eat, you can either eat it right from the jar or you can pop it out of the jar... The greasier crust (since we used the extra-buttery, extra-yummy crust recipe!) helps it pop out with a bit more ease... although we did use a butter-knife around the sides to loosen it up a bit.


And just so you know - this hot apple pie and whipped cream? You'll think you would have died and gone to Heaven!

The best part about these pies-in-a-jar is that if you and your family can't fully agree on the best pie, you can make many different options (easier, of course, if you use the canned pie filling!)! It's just a matter of putting in the different fillings! And then you can use a Sharpie marker to write on the mason jar top what kind of pie is inside!!

3rd Wedding Anniversary

My hubby and I were married on February 1, 2006. It was a small wedding with a delicious cake with pineapple and strawberry fillings.

We didn't keep the cake til the 1 year anniversary...more like 1 week (Really - how many of you that froze your cake for a year, enjoyed the taste of it?)...

So come our 1st anniversary, I went out and bought a small cake from the same place with the same fillings... I believe I actually did that for year 2 as well... But it was getting expensive and we didn't like what they put on the side of the cake as decoration when you got these smaller pieces... So I decided to try making pineapple and strawberry flavored items.

Just before our 3rd anniversary, I found this picture and recipe in a magazine:


EASY PEASY!!!! Take some pound cake, cut it in cubes, make the canned flavored frosting a bit runny, dip the cake, put it on some wax paper, and sprinkle with jimmies. So, I made my strawberry frosting and since I couldn't find pineapple flavoring, we had banana...


*Facepalm* So you remember how I said I don't always read directions carefully? This would be one of those times.

I did the strawberry ones first. Despite me following the directions of how to heat the frosting, I apparently didn't make the frosting very runny, so at the end, it was getting a bit rough. The banana ones, I felt I had learned from the first batch and I made the frosting more runny. As you can see, it's a bit better of a coat job. Then, I topped both off with heart-shaped jimmies (if there's one good thing about having a wedding anniversary so close to Valentine's Day, it's to have a ton of heart-shaped stuff!).

Issues I encountered:
#1, I re-read the directions when typing it out for a friend (venting about how they didn't turn out right even though I "did what the directions told me")... Found out I should have frozen the pound cake - that would have helped with cutting it so that the pieces wouldn't be falling off in the frosting.

#2, While I re-read the directions, I was supposed to use some sort of gel in the frosting. Still not sure about that one, but I guess it would have made it smoother. Maybe they were talking like Wilton Gel Icing Colors...

In any case, since then, I have yet to attempt that again. I've done other strawberry-pineapple experiments like Jell-O (safe, but not as fun) and cupcakes... I think our anniversary cake for our 6-year anniversary will be a bit more creative... I hope! LOL